Importing and Configuring a Data Import
IMPORTANT: This system is cleared for data up to Business Impact Level 1 (BIL1) only. Refer to your data policy before uploading data.
When you have prepared your data file(s),and successfully uploaded it to Horizons, you configure how Horizons treats certain data fields.
To configure the data import
- In the Management module > Data Import drop-down, do one of the following:
- Select an existing unprocessed data import item to configure.
- Click Add import and import a new data file (see Uploading a Data File). The Configure Data Import window opens.
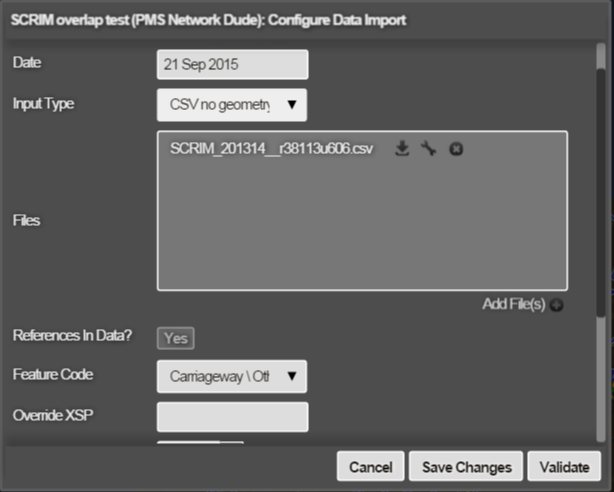
- Complete the settings as follows. The settings you see depend on the input type and whether there are references in the data.
Settings
Date
Enter the desired date (i.e. survey date, works completion date). If no date is specified, the date defaults to the date of the import.
Input Type
The input type must match the type of file being imported. There are two CSV options—with and without geometry. If importing a CSV file that does not contain any spatial representation and where referencing relies on Section references (and potentially also chainages) in the file, select CSV no geometry</span>. Otherwise, select CSV with geometry. See Mapping Data Items with No Geometry
References in Data?
Horizons needs to associate every item of data with a Section in your Network. To make these associations, either:
- The data itself must contain Section references* The data must have coordinate information so that Horizons can match the items by their proximity to Sections If your data contains both coordinates and section references, you can choose whether to use the references in the data, or have Horizons automatically set the references based on geometry.
Yes — if Section references are included in the file. If there is no geometry in the import file, the file must contain Section references and this field must be set to Yes. No — otherwise. Sections references are set automatically based on geometry
For more information on the Section references that can be included or not in the data, see:
See About References Included in Data
See About References Not Included In Data
Feature Code
Select the asset type that the imported data refers to. The default for this field is Carriageway. Only change this if you are importing data for other asset types. The Feature Code you select also acts as the single Feature Code for the imported data in Analysis. Make sure to select the correct Feature Code to ensure accuracy in Analysis. See Mapping Data Items with No Geometry
Override XSP
Any Cross Sectional Position (XSP) data in the import files can be overridden. To do so, enter the desired XSP value in this field. This value is used as the XSP for all data imported in the data file into the system. Where an XSP is not provided, the XSP defaults to Carriageway Centre (CC). See Mapping Data Items with No Geometry
Override Offset
If there is no geometry in the import file data, items are mapped onto the Section centreline or offset from it using per-item XSP or a given offset in metres. Alternatively you can override the offset for all items with this setting.
EPSG code
If your data file contains item coordinates (e.g. GIS format or CSV with Geometry), it is assumed that the geometry present in the file is in OSGB coordinates (EPSG reference system ID 27700, including OSTN02 shifts for high accuracy). If this is not the case, you can override this by specifying the EPSG code for the coordinate system (e.g. code 4326 for WGS84 long/lat coords).
References Included in Data
Section Length Tolerance (m)
Section Length Tolerance (%)
Validates the import data to ensure that data fits the Network definition appropriately. This setting ensures that no chainage measures in the import file exceed the Section length by more than the length given in meters or percentage length (whichever is greater). See About References Included in Data
Max Chainage Adjustment
This setting is optional. It limits any rescaling that is required to chainage values so that items fit the Network Sections. If the conversion to digitized chainage requires an adjustment by more than the given absolute distance, setting this causes an error for the item. See About References Included in Data
References Not Included in Data
Section Ref. Max Distance
All Sections within this distance of an item are considered as candidate Sections for the item. See About References Not Included In Data
Section Ref. Expected Distance
Sections within this distance of an item have a much higher proximity weighting than those beyond this distance. This distance is used as a balance for how parallel the item is against each candidate Section (for line items only). Set this small if your item and Network accuracy is high and you expect items to be close to the Sections. Set this bigger if accuracy is not high, or if you expect items to be further from Sections, or to weight the Section matches more towards line items that are both close and parallel to nearby Sections. See About References Not Included In Data
Force To Section In File
If all or some of your data items include a section label reference, you can force Horizons to choose that section for the item. Select :
- Yes — Force Horizons to choose that section for the item. You’ll also need to select which field represents the section label in your data when configuring the Import Fields. Horizons will automatically set appropriate chainage and offset for these items during the import. Items in your data that have no section label specified will be automatically assigned to the closest section.
- No — Section references, including chainage, and offset will be assigned automatically. See About References Not Included In Data
Minimum Length After Classify
Set the minimum length for an item after the Automatic Referencing adjustment is performed. We recommend 1m. See About References Not Included In Data
Auto Line Split
For long line items, if the item spans more than one Section it can be split up into separate items by enabling Auto Line Split. Each separate item becomes associated with its own Section. If this is not enabled and long items are present in the data, they are associated with the Section that has the longest overlap with the item, and the item chainage is set to match this overlap. The item appears as one long item in the map, but is associated only with the one Section. See About References Not Included In Data
- When the Data Import is defined, click Validate.
The data files are validated. Any errors found in the file are reported and must be addressed before data is made available as a data source within the system. For further details of the validation process, see Validating and Processing a Data Import.
Next you can map the fields in your data file to the settings required by Horizons. To do so, click the spanner icon beside the uploaded file(s). The Configure Fields window opens. Here you can give meaning to the data to be imported by describing either the attributes in GIS files or similarly columns in CSV files. For a full procedure and description of the fields, see Configuring Data Import Fields.