Upload files
Prepare and upload data
The first step of a data import is to prepare and upload the source data. Several tabular file formats are supported. Each data item needs geometry coordinates, Section references, or both to be matched to a Section in your Network.
Supported formats
| Format | Extension | Geometry? | Section References? | Notes |
|---|---|---|---|---|
| MapInfo GIS | .tab | Yes | Optional (as attributes) | Upload the master file and all sidecar files together, e.g. .dat, .map, .id |
| ESRI Shapefile | .shp | Yes | Optional (as attributes) | Upload the master file and all sidecar files together, e.g. .dbf, .shx, .prj |
| CSV (geometry) | .csv | Yes | Optional | Coordinates can be point, line or WKT. Default coordinate system is OSGB (EPSG 27700) |
| CSV (no geometry) | .csv | No | Required | Requires a Section label column. Start/end chainages and Section length columns are recommended |
Convert Excel to CSV
It isn't possible to upload Excel spreadsheets as .xls or .xlsx files. To convert them:
-
Open the file in Microsoft Excel.
-
For any columns containing numbers over three digits, right-click the header and choose Format Cells. Select the Number category and uncheck Use 1000 Separator. This prevents values like
1,000being imported as text. -
Select File > Save As. Change the type to CSV (Comma Delimited) (*.csv) and save.
Example CSV
The following table illustrates a basic CSV import. Each row is a data item. It includes columns for Section references, UKPMS codes, geometry and two condition parameters. The names and order don't matter, as they will be matched to Asset Strategy fields in the next step.
| section | length | start_chn | end_chn | feature | xsp | geometry_wkt | rutting | texture |
|---|---|---|---|---|---|---|---|---|
| A576 036 | 50.27 | 0 | 11.83 | CW | CL1 | LINESTRING (386600.5 405673.4, 386588.7 405673.9) | 0 | 1.67 |
| A576 036 | 50.27 | 11.83 | 26.61 | CW | CL1 | LINESTRING (386588.7 405673.9, 386573.9 405674.4) | 0 | 16.67 |
| A576 036 | 50.27 | 26.61 | 41.4 | CW | CL1 | LINESTRING (386573.9 405674.4, 386559.9 405673.9) | 14 | 28.33 |
| A576 036 | 50.27 | 41.4 | 50.27 | CW | CL1 | LINESTRING (386559.9 405673.9, 386551.2 405672.4) | 28 | 38.33 |
| A576 046 | 89.55 | 0 | 23.13 | CW | CL1 | LINESTRING (386863.5 405622.3, 386860.5 405623.2) | 0 | 10 |
| A576 046 | 89.55 | 23.13 | 43.56 | CW | CL1 | LINESTRING (386860.5 405623.2, 386850.5 405626.4) | 69 | 25 |
| A576 046 | 89.55 | 43.56 | 64.04 | CW | CL1 | LINESTRING (386850.5 405626.4, 386840.9 405629.3) | 100 | 45 |
| A576 046 | 89.55 | 64.04 | 89.55 | CW | CL1 | LINESTRING (386840.9 405629.3, 386830.5 405630.7) | 65 | 45 |
Upload the file
-
In the Management toolbar, select Data Import and then Import Data.
-
In the next window, enter a name for the import and choose the Network to upload against.
-
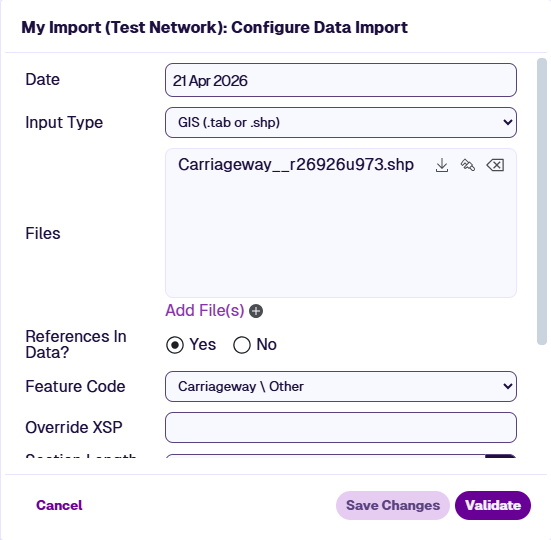
In the next window, choose the correct Input Type for your file(s):
-
GIS - for
.tabor.shpfiles. -
CSV with geometry - for
.csvfiles with coordinates. -
CSV no geometry - for
.csvfiles with only Section references.
-
-
Select Add File(s) and choose one or more files to upload:
-
For GIS imports, upload the master file and all its sidecar files at once (only the master will appear in the Files list).
-
For CSV imports, you can select multiple files at once if they share the same column format.
When the upload is complete, select Close.
-
-
The Configure Fields window should open automatically. If not, select Configure Fields beside the uploaded file.