Configure data import
Match data items to your Network
The next step of a data import is to configure its settings. This determines how data is mapped to your Network.
Each row of import data requires at least one of these:
-
References - a Section label and optional start/end chainages to define its linear position in the Network.
-
Geometry - point, line or polygon coordinates to define its appearance on the map.
If one is absent, the other is used to derive it.
The following settings control how import data items are matched to Sections, with different options for reference-based and geometry-based matching. Select Save Changes to finish.
You can change these settings at any time before validating the import.
Common settings
These settings appear for all input types:
-
Date - associate the import data with a given date, e.g. survey or works completion date. If left blank, it defaults to today.
-
Files - upload one or more prepared files. For each file:
-
Generate template - download a reusable template of the current field configuration.
-
Configure fields - match the file's data fields to Asset Strategy fields.
-
Remove - delete the uploaded file.
-
-
Input Type - choose the type that matches your files:
-
GIS (.tab or .shp) - file contains geometry. May contain references as attributes.
-
CSV with geometry - file contains geometry. May contain references as columns.
-
CSV no geometry - file contains only references.
-
-
Feature Code - choose the asset type described by the import data. Defaults to Carriageway / Other.
ImportantIf you're importing condition data for use in Analysis, ensure this is set correctly. Any fields marked In Scheme will only be available as Condition Parameters for this asset type.
-
Override XSP - apply the entered XSP code to every data item. If left blank, items without an XSP code, geometry or offset are placed at the Section centreline.
Common XSP Codes
An XSP (Cross Section Position) describes where something sits across the width of a road.
Carriageway lanes are numbered from the nearside edge toward the centre. For single carriageways, use
CLcodes only. Features outside the carriageway (kerbs, footways, verges) use Off Carriageway Position codes, numbered outward from the carriageway.Minimal codes give a generic position for the whole carriageway or one side when precise position isn't important. Asset Strategy simplifies the UKPMS Minimal set to just three codes (UKPMS codes like
LK,LF,LVaren't accepted).For full details, consult the UKPMS user manual.
Cross Section Position (XSP) Left Right Minimal Carriageway Centre CC — C Carriageway Lane 1 CL1 CR1 C Carriageway Lane 2 CL2 CR2 C Carriageway Lane 3 CL3 CR3 C Hard Shoulder LH RH C Off Carriageway Position 1 L1 R1 L/R Off Carriageway Position 2 L2 R2 L/R Off Carriageway Position 3 L3 R3 L/R
This setting only appears for GIS and CSV with geometry:
- EPSG code - use this coordinate system for imported geometry. If left blank, the default is
27700(OSGB36 / British National Grid) with OSTN02 shifts.
This setting only appears for CSV no geometry:
- Override Offset - apply the entered offset to every data item, measured in metres from the Section centreline. If left blank, items without an offset are placed on the centreline.
References in Data?
This setting controls how data items are matched to Sections in your Network:
-
Yes - use the references in the import data.
-
No - use the geometry in the import data to derive references.
If the import data has no geometry, it must contain references, so Yes is required. If it contains both, you can choose either approach.
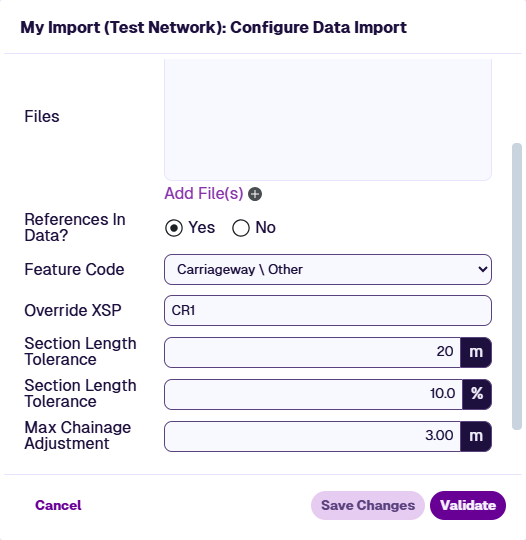
With references
If Yes is selected, each data item is mapped to your Network using these configured fields.
| Configured Field | Required? | Notes |
|---|---|---|
| Section Label | Yes | If the Section isn't found in your Network, an error is raised |
| Start Chainage | No | Without End Chainage, maps the item as a point |
| End Chainage | No | With Start Chainage, maps the item as a line. If neither is provided, the line spans the entire Section |
| Section Length | No | Improves chainage scaling, as the surveyed length may differ slightly from the digitised length in your Network |
| Offset | No | Without item geometry, this positions the item parallel to the Section centreline. Positive = right, negative = left of the Section direction |
| XSP | No | UKPMS cross-section code. Without item geometry or the Offset field, this determines the item's offset |
These settings also appear:
-
Section Length Tolerance (m) and (%) - validation will fail if a Section Length value differs from the digitised Network length by more than both thresholds.
-
Max Chainage Adjustment (m) - raises an error if rescaling any chainage to the digitised Network length requires an adjustment greater than this distance.
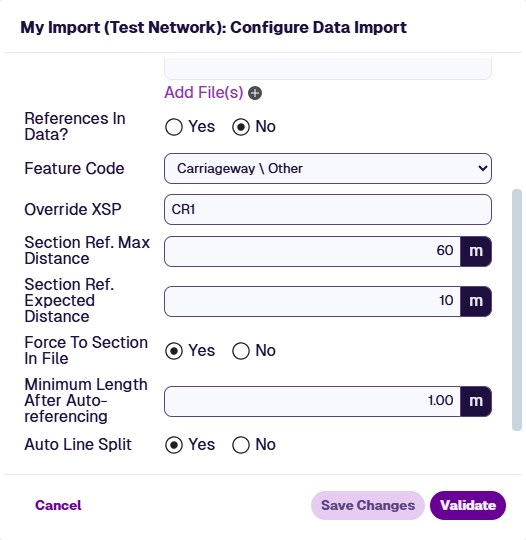
Without references
If No is selected, each data item is mapped to your Network using its geometry. The Section, chainage and offset are derived automatically from the item's coordinates. For line items, parallelism to nearby Sections is also considered, reducing incorrect matches at junctions.
These settings also appear:
-
Section Ref. Max Distance (m) - all Sections within this distance of the item are considered for matching.
-
Section Ref. Expected Distance (m) - all Sections within this distance get a higher proximity weighting. Set small for high-accuracy data close to Sections. Set larger when accuracy is lower or items are expected to be further away.
-
Force To Section In File - if enabled, match the data item to the Section Label where provided, while still deriving chainages and offset from the geometry. Raises an error if the label isn't found in your Network or is beyond the Max Distance.
-
Minimum Length After Auto-referencing (m) - any shorter line items are lengthened to this minimum.
-
Auto Line Split - if enabled, line items that span multiple Sections are split, one item per Section. If disabled, the item is matched to the Section with the longest overlap.