Create a Works Plan
Define and build a full Works Plan
When managing Works Plans, select Create Works Plan in the bottom-left corner to start creating a new one. If the button is dimmed out, select in the top-right corner to close the current Works Plan first.
Fill in the following fields according to your needs. Fields marked with an asterisk * require a value to continue. As you do so, pay attention to any notes and warnings that appear on the right. These explain why some Performance Strategies cannot be selected alongside others.
Works Plans use many features in the Analysis module, so make sure they're set up correctly for your organisation before getting started. See Works Plan Considerations.
1 Details
Set the number of years you want to plan for. Select a Treatment Set to base the plans on and the Budget available for works:
-
Name * - enter a distinct name that clearly identifies the Works Plan.
-
Works Plan Notes - enter any amount of text to further describe the Works Plan. If you're building multiple revisions or variations of a Works Plan, it may be useful to list the significant differences here.
-
Years to run - drag the slider to set the number of financial years the Works Plan should cover. Typically, asset condition is deteriorated to the start of the first year (see Treatment Set Details). Each subsequent year uses the calculated conditions of the previous year's output.
See diagram
When generating a Works Plan, Horizons follows this process:
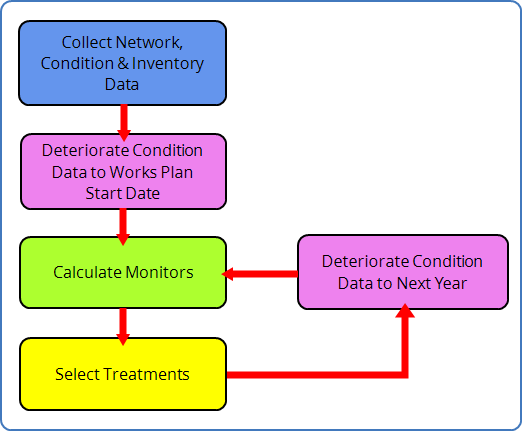
Monitors show condition data for each year before works are completed. Treatments are selected each year to meet the next year's Strategy targets.
You can see monitors after works are completed by running the analysis for an extra year.
-
Years visible in explorer * - after the Works Plan completes, each financial year of the recommended scenario (typically the cheapest that meets all Performance Strategies) can be visualised as a Layer in the Explorer module. Enter the number of years you want to generate Layers for.
CautionSetting this higher than 6 years may result in slow performance!
-
Treatment Set * - choose a completed Treatment Set from the list. This will serve as the foundation of the Works Plan. It defines which Network assets will be analysed, the hierarchy of possible Treatments and their trigger rules, subsection length, merge details, and plenty more!
-
Budget * - choose an available Budget or Sub-budget from the list. All potential Treatment schemes will be costed against this. If Include Performance Strategies is enabled, you can enable Limited By Budget to prevent that scenario from exceeding the budget amount.
If a Sub-budget is chosen, it isn't possible to select a Backlog Performance Strategy, as a backlog can only be defined against a complete budget.
-
Prioritisation - choose an available Priority from the list. This adds weighting to Treatment schemes within the locations represented by the Priority.
Details
If a Prioritisation is set, a Prioritisation Score is calculated for each potential Treatment scheme.
First, a Priority Score between
0and1is calculated for each subsection in the scheme. This uses the weighting values for each Priority Layer Style that overlaps the subsection, e.g. if all Layer Styles in the Priority overlap the subsection, its Priority Score will be1.The sum of these Priority Scores becomes the Scheme Prioritisation Score. This is added to the Scheme Condition Benefit Score, which ultimately determines the ranking and selection of Treatment schemes in each Works Plan scenario.
2 Scenario types
Select the scenarios to include in the Works Plan. Each scenario takes a different approach to asset management, using different criteria to select potential Treatment schemes across the specified number of years. After the Works Plan completes, you can view the results of each scenario and compare their performance.
Asset sweating
This scenario targets asset subsections that will benefit most from treatment. By default, it selects only Treatment schemes flagged as Last Chance. If these are left untreated, a more severe and costly Treatment will likely be required the following year. These schemes are selected in descending order of Benefit-Cost Ratio (BCR) Score until the budget is consumed. No Performance Strategies are involved.
Other Treatment schemes are deferred. This allows assets to deteriorate gracefully, maximising their utility and lifespan.
However, if Use Residual Budget is enabled, any surplus budget will be used to fund other Treatment schemes that aren't flagged as Last Chance. These are also selected in descending BCR order, until the residual budget is consumed.
- Include Asset Sweating Scenario - if disabled, this scenario won't be included in the Works Plan's results.
If Prioritise Schemes by BCR is enabled, this scenario will no longer target Last Chance schemes! Instead, all potential Treatment schemes are selected in descending BCR order until the budget is consumed, regardless of the Use Residual Budget setting.
Worst first
This scenario targets asset subsections that are in the worst condition, regardless of their Benefit-Cost Ratio (BCR). Treatment schemes are simply selected in descending order of raw Condition Score (worst first) until the budget is consumed, so there is never any residual budget.
- Include Worst First Scenario - if enabled, this scenario will be included in the Works Plan's results.
Performance Strategies
This scenario tries to meet all of your selected Strategies. Each Strategy defines a target to be met, such as minimising an emission, or keeping a Condition Parameter below/above a threshold.
Treatment schemes are selected in descending order of Benefit-Cost Ratio (BCR) Score, with Last Chance schemes given top priority by default. This continues until all the Performance Strategies are met, even if the budget is exceeded.
-
Include Performance Strategies - if enabled, this scenario will be processed and included in the Works Plan's results. The following fields will also become visible.
-
Limited By Budget - if enabled, the total cost of selected Treatment schemes cannot exceed the budget amount. While this prevents the scenario from going over budget, it may result in required Treatment schemes being deferred.
Add Performance Strategies
To add one or more Strategies to this scenario:
-
Select Add Performance Strategy at the bottom.
-
In the picker, select the icon beside the relevant folder to see the available Strategies:
-
Network - these target thresholds for network-level Condition Monitors, e.g. 130-01 (A-Roads red-band %), BVPI 224b (U-Roads red-band %). You can include multiple Strategies simultaneously, provided that they specify targets for different monitors.
-
Local - these target thresholds for local Condition Parameters. You can select multiple Strategies but only for different parameters, e.g. you cannot select two Strategies that target the "Mean Rutting" parameter.
-
Backlog - these target a maximum cost threshold for deferred Treatment schemes. Only one can be selected. It can't be used alongside any Emissions Strategies or Sub-budgets.
-
Emissions - these target a maximum threshold for gases emitted by performing Treatments. Only one can be selected. It can't be used alongside any Backlog Strategies, as stated above.
-
-
Select one or more of the listed Strategies, as described above.
-
Select to return to the folders. Repeat for any other folders in accordance with your requirements and the restrictions described above. Select Save to finish.
Only Strategies that apply to the chosen Treatment Set are shown. If the folders appear empty, make sure this is set in the 1 Details section.
To remove a Strategy from this scenario, select the icon beside it.
3 Scenario settings
Configure the following settings for the selected scenarios:
-
Use Residual Budget - all scenarios except Worst First will utilise the full budget amount. If a scenario meets all its targets below the budget, it will use the residual amount to select more Treatment schemes until the full budget is consumed. If disabled, scenarios are allowed to be under budget.
-
Prioritise Schemes by Benefit Cost Ratio (BCR) - if enabled, all scenarios except Worst First will no longer prioritise Last Chance schemes. Instead, all potential Treatment schemes will be selected in descending BCR order until the budget is consumed, regardless of the Use Residual Budget setting.
-
Allow Short Treatments - by default, Treatment schemes are deferred if they're shorter than the Treatment length min property of the Treatment. However, this can prevent Performance Strategies being met! If enabled, these short Treatment schemes can be selected in any scenario, but only to meet Performance Strategies that would otherwise fail.
NoteShort Treatment schemes are never selected to fill the residual budget.
Build
When you've finished configuring the Works Plan, select Run Works Plan build at the top. Alternatively, select in the top-right corner to discard the Works Plan.
Depending on the size of your Network, it may take a while to process! During this time, the Works Plan will appear in the Processing folder, where you can track its progress.
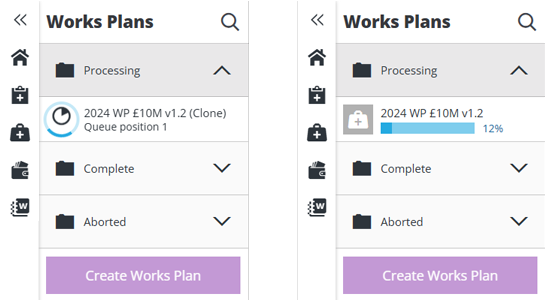
When the build finishes, you'll receive an email notification and the Works Plan will be moved to the Complete or Aborted folder accordingly.
If you need to make any adjustments to the processed Works Plan, select it in the left list, and then select the Clone icon in the top-right corner. This creates a new Works Plan with the same configuration as the original, which you can then edit and build.